
low taper
The low taper fade is a timeless hairstyle that has been a staple in men’s haircuts for years. Known for its clean, sharp, and polished look, this fade is subtle yet stylish, making it suitable for various occasions and face shapes. Achieving a perfect low taper fade requires precision, the right tools, and a bit of know-how. Whether you’re looking to do it yourself or take it to the barbershop, this guide will walk you through the process, offering valuable tips and tricks to help you get the best low taper fade.
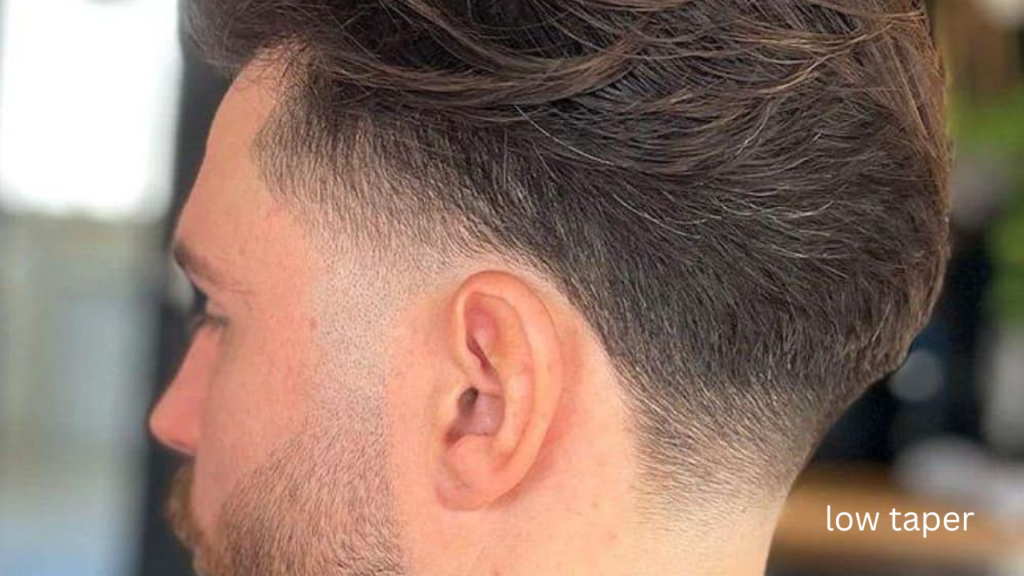
What is a Low Taper Fade?
Before diving into how to achieve a perfect low taper fade, let’s first understand what it is. A low taper fade is a hairstyle where the hair gradually shortens as it moves down the sides and back of the head. The fade begins just above the ear, creating a subtle and natural look compared to higher fades that start closer to the temples. The result is a smooth, clean transition that blends the hair seamlessly with the scalp.
Why Choose a Low Taper Fade?
There are several reasons why the low taper fade remains a popular haircut:
- Versatility: The low taper fade works well with various hairstyles, from short buzz cuts to longer, slicked-back looks.
- Professional Appearance: Because of its subtle nature, the low taper fade is ideal for professional environments where a clean, polished look is preferred.
- Minimal Maintenance: While all fades require some maintenance, the low taper grows out naturally, requiring fewer touch-ups compared to higher fades.
- Suits All Face Shapes: The low taper is flattering for nearly all face shapes, from round to square, and complements a variety of hair textures.
Step-by-Step Guide to Achieving the Perfect Low Taper Fade
Achieving a perfect low taper fade can be done either at home or by visiting a skilled barber. If you’re attempting this fade yourself, it’s essential to have the right tools and patience. Follow these steps for a flawless low taper fade:
Gather Your Tools
To start, make sure you have the necessary tools. These include:
- Clippers: A quality set of clippers with various guard sizes will allow you to create different lengths as you fade.
- Combs: A fine-tooth comb helps guide the hair during the fading process, ensuring that the cut is smooth and even.
- Scissors: If you’re working with longer hair on top, scissors will help you trim and shape the top portion of your hair.
- Shaving Razor or Trimmer: A razor or trimmer is used to clean up the hairline, especially around the edges and neckline.
- Mirror: A handheld or three-way mirror will help you see the back of your head to ensure an even cut.
- Hair Clips: These are essential for keeping the longer hair out of the way while you work on the fade.
Start with Clean, Damp Hair
Begin by washing and dampening your hair. This step helps make the hair easier to manage and cut, as wet hair is typically more pliable. Use a towel to gently dry it so that it isn’t too wet, but still manageable.
Trim the Top to Your Desired Length
If you’re aiming for a specific look, start by trimming the top of your hair to the desired length. For a traditional low taper fade, the top should be slightly longer than the faded sides. You can use a clipper guard to trim the top to the length you prefer (usually between 1 to 3 inches). Alternatively, you can use scissors for a more refined finish. Make sure the top is even by running your comb through it while cutting.
Begin the Fade Process
Now that the top is trimmed, it’s time to fade the sides. The goal is to create a smooth transition from the short hair on the sides to the longer hair on top. Here’s how to do it:
- Start with the longest clipper guard: Begin by attaching the longest guard (usually #4 or #5) to your clippers. Starting at the bottom of your hairline, move upward, working on the first section of hair near the ear. Fade the hair upwards until you reach the length of the hair on the top of your head. This will set the foundation for your fade.
- Switch to a shorter clipper guard: Once the longest section is cut, switch to a shorter clipper guard (usually #3 or #2). Repeat the process, working from the ear upwards. The fade should gradually become shorter as you move down the head. Ensure that you blend the shorter section with the longer part of your hair by moving the clippers in an upward motion in a circular fashion.
- Use the clippers without a guard for the final fade: For the lowest part of the fade near the ear and neckline, switch to your clippers without a guard. Carefully trim the hair to create a clean, sharp line. You can also use the trimmer to clean up any stray hairs around the edges for a crisp finish.
Blend the Fade for a Smooth Transition
A flawless low taper fade requires smooth blending between the different lengths. Use a technique called “clipper-over-comb” to blend the fade. This involves using a comb to lift the hair while trimming it with the clippers, ensuring that there are no noticeable lines or harsh transitions between the shorter and longer hair.
Clean Up the Edges
Once you’ve completed the fade, it’s time to clean up the edges and neckline. Using a razor or trimmer, carefully define the hairline around the ears, neck, and temples. This will give your low taper fade a fresh, polished appearance. Make sure to avoid cutting too high or low to keep the fade looking natural.
Finish with Styling
Finally, style the top of your hair as desired. Whether you prefer a slicked-back look, a pompadour, or simply a more textured finish, apply the necessary styling products such as gel, wax, or pomade. Use a blow dryer if necessary to add volume or texture to the top portion of your hair.
Tips for Achieving a Perfect Low Taper Fade
Achieving a perfect low taper fade doesn’t happen overnight. Here are some helpful tips to ensure a successful fade:
- Take your time: The low taper fade requires precision, so don’t rush the process. Work slowly, blending each section carefully.
- Use the right clipper guards: Using the right clipper guard is essential for a smooth fade. Start with the longest guard and work your way down.
- Check for evenness: Continuously check the fade by looking in a mirror to make sure both sides are symmetrical. If you’re doing it yourself, a three-way mirror can help you see the back of your head.
- Blend well: The key to a great low taper fade is a seamless blend between different lengths. Make sure the transition is smooth, without any visible lines.
- Maintain your fade: Low taper fades tend to grow out naturally, so schedule regular haircuts to maintain the clean look.
Common Mistakes to Avoid
When trying to achieve a perfect low taper fade, it’s easy to make a few common mistakes. Here’s a list of things to avoid:
- Uneven blending: Make sure the fade is consistent on both sides. If one side is shorter or less blended than the other, it will be noticeable.
- Starting the fade too high: A low taper fade begins just above the ear. Avoid starting the fade too high, as it will no longer have the subtle, low fade look.
- Cutting too much off the top: While the sides are gradually faded, ensure the top stays long enough to maintain the classic low taper fade style.
Conclusion
A perfect low taper fade is a versatile, stylish haircut that suits nearly all face shapes and hair types. Whether you’re trying to achieve the look on your own or visiting a professional barber, following the steps outlined in this guide will help you achieve a sharp, clean fade. With practice, you’ll be able to master the low taper fade, maintaining a polished and fresh look every time. So, grab your clippers, take your time, and enjoy the process of achieving the perfect low taper fade.
Frequently Asked Questions
How long does a low taper fade last before it needs a touch-up?
A low taper fade typically lasts between 3 to 4 weeks before needing a touch-up. However, this can vary depending on how quickly your hair grows.
Can I achieve a low taper fade on my own?
Yes, it’s possible to achieve a low taper fade at home with the right tools and patience. However, it requires precision and skill, so take your time and use a mirror to check for symmetry.
What’s the difference between a low taper fade and a high taper fade?
A low taper fade starts just above the ear and gradually blends down to the skin, creating a subtle look. In contrast, a high taper fade starts higher on the head, closer to the temples, creating a more dramatic contrast.
What face shapes suit a low taper fade?
The low taper fade is flattering for most face shapes, including round, square, and oval faces. It softens angular features and works well with different hair types.
How can I maintain my low taper fade for a longer-lasting look?
To maintain your low taper fade, visit the barber regularly for touch-ups, and keep your hair clean and healthy. Use the right hair products to style the top and keep the fade looking sharp.
You May Also Read: https://bunkralbum.co.uk/freezenova-unblocked/